Installation manual
Always read the manual. Comprehensive installation instructions are available to download from our website (www.granex.org) or from your local distributor. MPP are under no liability in respect of any defect arising from the failure to fit the product in accordance with these instructions.Training clinics are also available. For information and any queries relating to installation, please contact your local Granex supplier before installation.

Visual Check – colour and surface
The colour match and surface condition of the worktops and edges being used together must be checked under good lighing conditions before fabrication Avoid bright sunlight. Lightly sand and wipe over both surfaces with a damp cloth to assess the colour. The manufacturer can not be held liable for colour variance or surface damage problems once the product has been installed. Always use the correct colour matched adhesive.
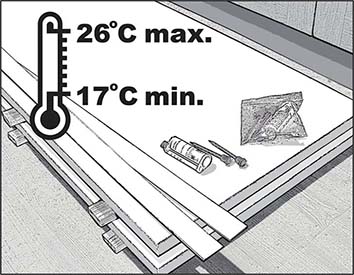
Temperature – min.17º C, max. 26º C
Before fabrication, worktops, edge strips and adhesive should be brought to room temperature of min.17º C (62º F) – max. 26º C (80º F). Temperature at the installation site is important as the rate of cure of the jointing adhesive can be affected by the temperature of the worktop. The adhesive will take longer to cure the colder it is and if it is too hot, it will cure too rapidly. Edging strips become brittle in cold temperatures so please handle with care.
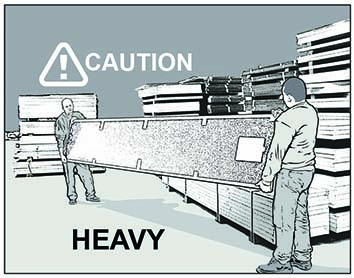
Handling, weight and storage
Granex worktops should be carried vertically to avoid any possibility of damage. Consideration should be given to the weight of the material when off-loading and installing. Store Granex worktops indoors in a dry, well ventilated area, preferably the installation site. Multiple components should be stored horizontally with adequate support along their full length. Do not rest on abrasive or gritty surfaces that may cause scratching.
Care and maintenance
General daily care in preserving your Minerelle work surface is as simple as wiping with a warm, damp cloth. For more stubborn stains always start by using the gentlest method first. For minor scratches use the Care & Maintenance Kit provided by your supplier. Do not use the worktop as a cutting board or to rest hot pans, dishes or appliances on the surface. Always use trivets, or work-top savers to avoid marking the surface. If deep scratches or impact damage occurs, use a Granex Repair Kit. Contact your local Granex supplier for advice.

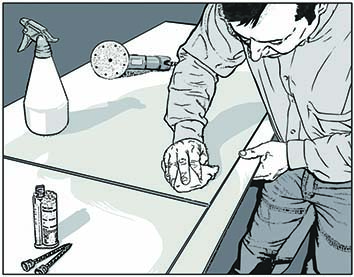
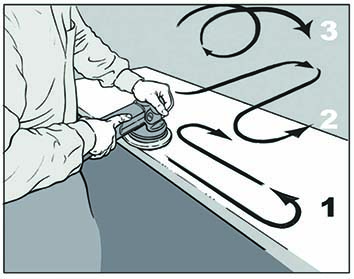
Surface finishing
A random orbital sander with good dust extraction is essential. Starting with the 180 grit abrasive disc, sand the entire surface East-West(1) then North-South(2), making sure to overlap by half the pad area as you progress. Follow with a circular, clockwise motion(3) and complete this stage by wiping the surface clean with a damp cloth. Do exactly the same using 240 grit, then 320 grit abrasive discs and finally, a ScotchBrite pad. Complete the entire process by treating the surface with Countertop Magic, leave a few minutes then buff off with a clean, dry cloth.
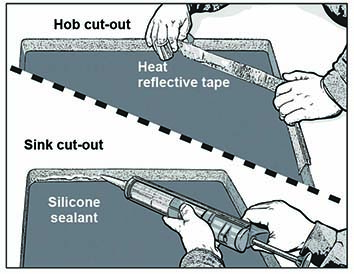
Cut-outs in the work surface
Under no circumstances must internal corners of cut-outs be square. Always machine a radius to internal corners, as large as is practical (8mm min). For hob cut-outs always use heat reflective aluminium tape around the entire cut edge and rim, top and bottom, of the cut-out. Ensure the tape stays in place when clamping the hob in position. For sink cut-outs use a generous amount of silicone sealant to seal the cut-out edges and the sink rim to the work surface. Generally, use silicone sealant on any exposed chipboard edges to ensure moisture resistance.
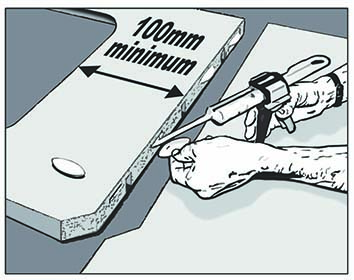
Joints
Carefully consider the placement of joints and offset them by at least 100 mm from all cut-outs. We advise using three worktop bolts on a 650mm wide top and four #20 biscuits evenly spaced for surface alignment and strength. Dry fit to check joint. All edges need to be chip-free and cleaned thoroughly with Imanol. Apply adhesive, 3 beads along edge and draw the joint together using bolts. Do not over-tighten, an adhesive bead is required along the entire joint line and you have 6-8 mins. To adjust joint alignment before adhesive sets. Use sharp blades to reduce risk of chipping.